September 24, 2008

O' Fun For... people with holes in their ears

The Gem Fair is returning this weekend, so I thought I'd share some of the things I've made with the beads from the last one. Lauralee gets 128 bonus points for taking us there last June, showing us what to get, and then showing us how to use it. I've had a lot of fun making bead-y things- it's all so sparkly and colorful! Ooooooo. Today I'll share the earrings with you.

Here are the earrings I've made so far:


I made this pair last night to go with the blue-stripey maternity shirt I made:


This pair is from some beads of Grama T.'s I have. I haven't decided whether I'll keep these or give them to another family member or whatnot:


I made these last night also. I guess they go with whatever you want them to go with. Mostly I just like to stare at the shiny, chromatically-placed beads:


These ones are my favorite. (Even though my wire-wrapping skills are lacking a bit...) They are very lemon-limey, and I enjoy the whole lemon-lime thing. My husband bought some lemon-lime Tic-Tacs the other day, and I just wanted to display them somewhere so I could stare at the colors a while.


Since the fetus/terrorist has been relentless, these posts may be kind of random for a while. Sorry about that. Also, since one of the reasons I made this blog was to share how I made these things, I realize I need wayyyy more tutorials. I'll go charge up the battery from my camera now so the next post I do can be a picture-heavy, detailed tutorial. I just don't know what of yet...

September 18, 2008

O' Fun For... fruity folks

I used the last remaining bits of energy I had to can peaches and pears on Saturday, pick blackberries on Monday, and make and can blackberry jam on Tuesday night. I ended up with 11 quarts of pears, 10 quarts of peaches, and 14 8 oz. jars of seedless blackberry jam. And zero more quarts of energy or motivation. Woo hoo! I feel so domestic. Here is a pic of my lovely jars o' fruitiness:


...and here is some evidence of my brain issues from this fetus. Please note that the lids were originally marked "10/08" and then I realized it was September, and tried to make the 10 into a 9 on all the lids.


Verna (my mom) has asked me before where I learned all this domesticity. I mean, I did learn while growing up which kind of Hot Pocket is best, as well as memorize how to prepare Easy Mac. (2/3 c. water, heat for 3:45 in the microwave.) I told her that I learned my domestic skills from the internet. It's true! The internet has taught me how to crochet, sew, cook, can, garden, and much much more. So, as I thought of all this whilst peeling pears for what felt like ten hours straight, I have decided to add this ode to my post today. I hope you like it.

Ode To Google

I turn to you with life's questions,
You'll always heed the call
With numberless suggestions-
Sometimes I check them all.

"How do I make this yarn
Into a blanket for my baby?"
Up comes a video tutorial
Of Instructional Crochet Lady.

"What can I make my family
For dinner all this week?"
You sent me to Allrecipes,
With everything I seek.

"I need to make some quilts
so I guess I need to know
not only how to piece them,
But first- how to sew."

Up popped blogs and craftzines
And from all those I found
A few that knew their stuff,
Their knowledge did abound.

Crushing garlic, growing herbs,
Solutions for tomatoes green,
I quickly jump from page to page
Gathering all that I can glean.

Oh, Google, if I had you not,
Wherefore would I look?
(I hear in times of old,
They'd check inside a book...)

September 14, 2008

O' Fun For... nerds who like funny old stuff and cooking

This is not about something I have made, but something I discovered on another blog I frequent. It is a site full of old cookbooks, scanned and made into pdf files, collected and posted by the Michigan State University Library and the MSU Museum. It is so much fun! I know I more or less stole this post from angry chicken, but I give her all the credit for this discovery, and thought I'd pass along the fun. I'll probably be at this for hours, and when I make something from one of the recipes I'll post it. Enjoy!

September 12, 2008

O' Fun For... fatties

I have been in a sewing frenzy this week. I am going to bet that I am having either a girl, or a very feminine boy. I hit the $1 and $2 fabric shelves at good ol' Wally's and completely lucked out. You never know, it's kind of hit and miss. You could score some cute swimsuit fabric, or maybe all there is that day are bolts and bolts of velvety, rust-colored upholstery fabric. Well, I came away dreaming of fatty clothes-a-plenty for my maternity-wearing days. (I've outgrown my jeans already. What is the deal with that?!) After scouring my boxes and boxes of Grama T. patterns, I was set to get rollin'.

Here we see the first shirt I made:


The pattern was a super-long v-neck tunic, and I only changed a few things. I added gathering under the bust and on the back, lettuce-edged the sleeves and neck out of laziness, added ric-rac (I may have spelled that wrong, but all the computer had for an alternate spelling suggestion was Richard. I am pretty sure I did not add Richard to the neckline. That could be awkward...) to the neck and some pleats to the middle. The next picture shows the gathered section in the back that I added to feel less tent-y:


Here in the next picture is a high-tech simulation of me being wayyy pregnant whilst wearing the shirt. (In real life I will look more like Monica from Friends in the fat suit.) I added 5 pleats on each side in the front to make it nice and roomy:


...and here is the same expert pregnancy simulation, but this time as if I were having twins: (I would like to credit Toby for the use of his soccer ball.)


The entire shirt, including thread, was about $2.50 when all was said and done. Woo-hoo!

I also made another preggo shirt. I tried to spray-stencil some flowers with spray paint, and it just had so many issues! I have been pretty successful with the freezer paper stencil so far, but only with fabric-specific spray paint. I had read that regular spray-paint worked too, so I thought I'd give it a try. It looked pretty crappy. Fortunately I had sprayed the fabric piece before I sewed it toether, so I just sewed it on inside-out, since the paint looked much better on the back of the fabric than the front. I also had to design my own sleeves for this pattern. They more-or-less worked. (Yay)


I have been cranking out the drawings of clothes I would like to make. This whole clothes-sketching thing was made much simpler by printing off this sample figure from Burdastyle. I just add some roundness to the middle, and there you go! I'll show more as I make them.

September 8, 2008

O' Fun For... pregnancy cravings extravaganza!!!

The baby has been sending me mixed messages all day. "Bread, mom, you really want bread..." "No, no, wait-- spaghetti sauce! I mean it this time, that's really what I want..." "Okay. I know for sure this time, it's peanut-buttery oatmealy m&m cookies. Do it!!! I'm warning you, I can make you feel pretty crappy if you ignore my every wish here!"

Sigh.

So, I followed the whims of the bossy fetus/terrorist. My lovely red Kitchen-Aid mixer is crying out for relief. The last batch of cookies is in the oven, the bread is securely Ziploc-ed away up on top of the cupboards from my bread-loving dog, and the sauce is bagged and ready to become tonight's pizza. You're startin' to wear me out kid. At least I have a few dozen cookies to comfort me during my post-baking energy slump...


Here's the link to the easy and fabulous bread from Allrecipes.com.

Here is where my particular loaves hide from my dog...


Here is the recipe for my red sauce (I made the recipe all by myself, which is why it contains several "ish" es...)

Mamma Dana’s Red Sauce

7-ish tomatoes, peeled
1 small can tomato paste
1 packet onion soup mix
LOTS of garlic powder, or some minced fresh garlic, or both
Big pour Balsamic vinegar (maybe 2 T.-ish or more?)
Med. Pour olive oil (1-2 T. ???)
A few sprigs fresh lemon-scented thyme
Salt and pepper to taste
Brown and white sugar, a few spoonfuls each (okay, I add lots of sugar, but just do it to taste.)
Cornstarch, about 2-3 t. (?) just shake it in until it’s as thick as you want

Blend the tomatoes in the blender, and pour into a pot. Add the rest while heating over about med to med-high heat. The garlic, sugars, vinegar, & oil are always just done to taste, so if it tastes too bitter, add more sugar, and taste and mix until you like it. I take the sprigs of thyme out before serving or storing. This sauce stores just fine in the freezer.


Here is the link to the cookies, also from Allrecipes.com


The fetus better be craving store-bought from now on...

September 7, 2008

O' Fun For....a hurried and late entrance to stake conference (church)

I got ready for church today and realized that I had made a bunch of the things from my outfit, so I decided to add them to my fancy-schmancy new blog. Unfortunately, this meant taking pictures of me. Blah. All photos except bracelet courtesy of my easy-going husband, James.

So... here is my whole outfit:


The headband, shirt, skirt, and bracelet are made by me. The shoes were a super-kick-butt-awesome deal at $2, and matched my shirt and headband exactly, so of course I had to buy them! The earrings were provided by a persuasive Honduran while we were on our cruise this last spring. The headband is just the 3" of fabric I cut off the hem of my shirt when making it.

Here is the bracelet: (sorry about the scary hairy hand, but that's what the macro setting on the camera does for ya')


It is one of my first attempts of jewelry making, done with all the sparkly new beads I got from the gem fair. My friend Lauralee was nice enough to be bead-mom and tour-guide to a few of us newbies at the gem fair. "No, no, not those ones, follow me girls! Yes. Those are the right ones. Buy those." ; )


Here is a close-up of the shirt and the pattern I based it off:


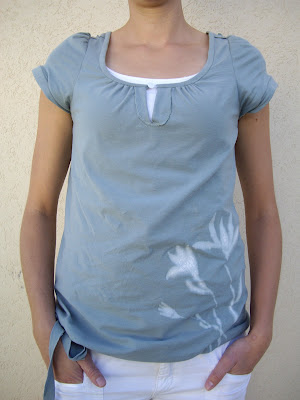
The pattern is one of about a gazillion I rescued from my late Grama T.'s sewing room. Grama was a sewing queen, and being told by my Aunt Jill that I could take home what I wanted from her sewing room was like winning the crafty lottery. I used the basics of the pattern, but used elastic thread on the bobbin to gather the neck instead of casing with elastic. The sleeves were gathered using the handy "stretch the elastic really tight and sew the fabric onto it" method. (Patent pending...) I also lengthened it, added a few rows of shirring with elastic thread under the bust, and added some random buttons. Ta-da! You can tell it is one of my favorite shirts by how the jersey is pilling already! Blast! I'll have to make a bunch more for maternity shirts.

Here is a close-up of the skirt:


It is made from an old pair of white jeans that had gotten a bit too baggy in the bum and too short in the legs. Since I did not make a tutorial while sewing, here is my ever-so-lovely hand-drawn tutorial...


*STEP ONE: Cut off the legs right below the crotch, and the waisty-area right above the crotch, being careful not to cut off the bottom of the back pockets.

*STEP TWO: Cut the legs on each side seam and up the middle (front and back), and then cut them in half at the knee. Cut the hem off all pieces that have cuff hem. You should have 16 leg panely-things, like so:


They will not all be exactly the same shape, but oh-well.


*STEP THREE: Sew a bunch of the leg panels together lengthwise until it is long enough to comfortably wrap around your hip-area. (Sew with short ends of panels facing the same way, so the skirt kind of flares at the bottom.) I didn't use all 16 panels. Now sew the end shut, and you have the skirt-piece. Measure the opening at the bottom of the jean-waist piece, and add pleats to your skirt piece until the measurement at the top matches that measurement.

*STEP FOUR: Sew the skirt piece onto the bottom opening of the waist piece. You may want to pin it and try it on first to make sure the pleats don't sit funny anywhere.


*STEP FIVE: Zig-zag about half an inch from the bottom of the skirt, and then cut tiny slits in the hem about every 1/2 inch or so all the way around so that it will fray faster. Well, that's it! That is my first vaguely-helpful tutorial! I hope you enjoy!

September 5, 2008

O' fun for..... pirate crews seeking new captains

Well, to start things off, I guess I'll show you two of my creations- my kids. They are often referred to as Cap'n Jack and Black Smith. (That was the only other pirate name the elder of the two thought worthy of the little pirate. Cap'n Jack informed him that he was the pirate who makes swords...)
I guess some of the credit for their creation has to go James and/or the mailman. And... I guess God may have had a hand in it as well. (Although some days I wonder about that last one...)
I am currently working on pirate #3, who is due to join our crew around May.

Cap'n Jack is a happy pirate here....


....but must have lost some of that "Happiest Place On Earth" magic by the time we took this pic. Or the little pirate just hit him, which might explain why little pirate is so happy...


Here they are swashbuckling or something pirate-y like that.