I BLOGGED! See? Right here below, there is a PICTURE-HEAVY TUTORIAL on how to do freezer-paper stencils! The Terrorist has slightly relented, allowing me to finally blog for you all! (All 3 of you. You know who you are...) Verna is visiting, and she helped me with this handy tutorial extravaganza. Thanks, Verna! Everyone needs their own Verna.
On to the tutorial-
We will begin with my trip to Wal-Mart to replenish my stencil-spray paint stash. This is what to look for on the shelves in the craft section. They sell them in multi-packs of colors. Having tried a few, here's what I can tell you about them- Black works the best. It is nice and even and does not bleed. Red and Copper are thick, but work fine if you shake them enough. Orange is thick and spattery, but that can be fun. Silver bleeds like crazy, so take care not to use too much detail or lay it on thick.


Materials needed:
*Fabric paint (spray works best)
*Freezer paper
*Shirts or whatnot to spray onto
*paper to draw or print design onto
*Marker to draw design with
*exacto knife (I wish I had one...) box cutter, or scissors
*tape and scrap paper to protect shirt and work surface from over-spray
*self-healing mat or cardboard or something to put under the image while you cut it with the blade
*iron and ironing board
*awesomeness of some kind

I let Toby draw his own design and then outlined it in marker. (Well, I eliminated some of the detail. You try cutting all that detail with a box-cutter!) Brady requested Lightning McQueen.

Cut a piece of freezer paper big enough to cover the image and put it shiny-side down on top of your design. Put these both on top of the self-healing mat or cardboard if you are cutting with a knife or blade instead of scissors. Scissors don't work very well for most detailed designs. Cut your design out of freezer paper by tracing over your marker-lines with the blade.


Good luck keeping your kids' fingers out of the way while you are working. Maybe now is a good time for a Sponge-Bob break...

When you are done, the freezer paper should remain wherever you want the shirt color to show through, and you should have cut out areas where you want the paint to cover. Sometimes you will have little, unconnected pieces to put back in place when you lay the stencil on the shirt. Put the stencil shiny-side down on the shirt, then iron into place. My iron was set to high heat with no steam. In these examples, McQueen will stay shirt-colored and be outlined with paint color. The shark will be filled in with the paint color.


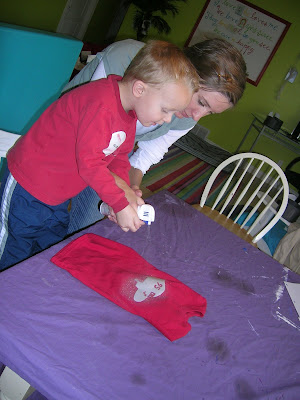
Once the stencil is ironed on to the paper, lay it out where you want to paint it. Cover areas of the shirt that you don't want painted with newspaper or scrap paper and tape it down so the over-spray doesn't creep on in. I like to cut corners, so I just folded the parts of the shirt not covered in freezer paper underneath. This makes the shirt all bumpy and not level, though, and if the paint is runny it will pool and bleed. (That's what I found out after using this slacker shortcut...) Shake the crap out of the can, point, and spray. Look, even Brady can do it!

I made a star shirt, and Verna made a flower shirt:


This is the point when you should take some Excedrin. The fumes will get you! I usually like to do the painting outside, but it was cold and wet today. After the paint is mostly dry, you can peel the freezer paper away and... TA-DA! Amazing! Here are today's finished products:
Thanks to the runny silver paint and the 3-year old "helper", this one bled a bit. Okay, a lot...

Toby's shark worked well:

My stars bled a ton, too. I laid the paint on way too heavy.

Verna got the hang of the silver. Super groovy, Verna!

Here is a dragon shirt we made for Toby when he started school. The image wraps around the entire shirt. To paint it I ironed the stencil on the front and back and then held it from a hanger outside while I sprayed the paint.


This is an example of what can happen when I don't force myself to simplify. Here's to you, James Taylor:

Phew! Well, I think that may have made up for 5 weeks of no posts. Don't expect another one that long for a while, but I will try to keep up with my blog!


