Showing posts with label shirt. Show all posts

February 9, 2009

o' fun for... endless crafting

Sorry it's been so long! To make up for it, I will post something new every weekday this week. Oh yes.

To begin, here is a link that you will love. (Or else!) It's the Top 100 Tutuorials of the year as ranked by http://www.thelongthread.com/ It is full of crafty goodness, so stick your kids in front of some Disney and get to it! (What? No.. that's not what I really do... that was just a joke...)

I recently made the kimono from a tutorial on the list. It is the 0-6 month size for a friend's baby shower gift. (I missed the shower, but late gifts are still fun, right?) Now I just have to deliver it before I decide to keep it for my baby...


No, I won't keep it. I'll just make one for Ellie also and then my friend and I can have matching wise-yet-comfy looking baby girls.

Enjoy the tutorial fun!

December 21, 2008

O' Fun For... Uncle Aaron and Uncle Brian

...but you can't tell them. It's their Christmas presents.

I had Toby draw 3 designs for me: one for a hooded sweatshirt for his Uncle Aaron, and two for t-shirts for his Uncle Brian. I then turned them into stencils and sprayed them. I think Toby's designs all turn out pretty dang awesome, if I do say so myself.

Here is how the hoodie for Aaron turned out:


The colors in the pictures were hard to get with the metallic paint, but it is a slate-blue hoodie with copper eyeballs on the back. Very cool.

Here are the two shirts for Brian:


The first, according to Toby's description, is of a bunch of different shaped lightning bolts all hitting the same place. It is in the copper paint. The second is an airplane getting hit by lightning. Kind of morbid, but oh-well, I guess that works well for grown-up-boy shirts.

Fun times! Now I only have one pair of pajamas and James' super-secret present left to make. And a few cheeseballs. Mmmmm..... cream cheesey goodness......

November 11, 2008

O' Fun For... people who enjoy huffing paint

I BLOGGED! See? Right here below, there is a PICTURE-HEAVY TUTORIAL on how to do freezer-paper stencils! The Terrorist has slightly relented, allowing me to finally blog for you all! (All 3 of you. You know who you are...) Verna is visiting, and she helped me with this handy tutorial extravaganza. Thanks, Verna! Everyone needs their own Verna.

On to the tutorial-

We will begin with my trip to Wal-Mart to replenish my stencil-spray paint stash. This is what to look for on the shelves in the craft section. They sell them in multi-packs of colors. Having tried a few, here's what I can tell you about them- Black works the best. It is nice and even and does not bleed. Red and Copper are thick, but work fine if you shake them enough. Orange is thick and spattery, but that can be fun. Silver bleeds like crazy, so take care not to use too much detail or lay it on thick.


Materials needed:
*Fabric paint (spray works best)
*Freezer paper
*Shirts or whatnot to spray onto
*paper to draw or print design onto
*Marker to draw design with
*exacto knife (I wish I had one...) box cutter, or scissors
*tape and scrap paper to protect shirt and work surface from over-spray
*self-healing mat or cardboard or something to put under the image while you cut it with the blade
*iron and ironing board
*awesomeness of some kind


I let Toby draw his own design and then outlined it in marker. (Well, I eliminated some of the detail. You try cutting all that detail with a box-cutter!) Brady requested Lightning McQueen.


Cut a piece of freezer paper big enough to cover the image and put it shiny-side down on top of your design. Put these both on top of the self-healing mat or cardboard if you are cutting with a knife or blade instead of scissors. Scissors don't work very well for most detailed designs. Cut your design out of freezer paper by tracing over your marker-lines with the blade.


Good luck keeping your kids' fingers out of the way while you are working. Maybe now is a good time for a Sponge-Bob break...


When you are done, the freezer paper should remain wherever you want the shirt color to show through, and you should have cut out areas where you want the paint to cover. Sometimes you will have little, unconnected pieces to put back in place when you lay the stencil on the shirt. Put the stencil shiny-side down on the shirt, then iron into place. My iron was set to high heat with no steam. In these examples, McQueen will stay shirt-colored and be outlined with paint color. The shark will be filled in with the paint color.


Once the stencil is ironed on to the paper, lay it out where you want to paint it. Cover areas of the shirt that you don't want painted with newspaper or scrap paper and tape it down so the over-spray doesn't creep on in. I like to cut corners, so I just folded the parts of the shirt not covered in freezer paper underneath. This makes the shirt all bumpy and not level, though, and if the paint is runny it will pool and bleed. (That's what I found out after using this slacker shortcut...) Shake the crap out of the can, point, and spray. Look, even Brady can do it!
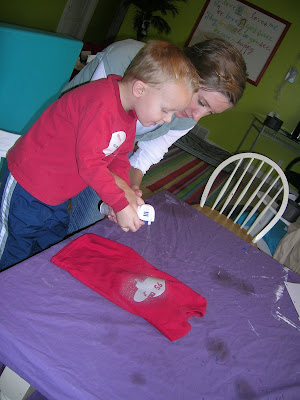


I made a star shirt, and Verna made a flower shirt:


This is the point when you should take some Excedrin. The fumes will get you! I usually like to do the painting outside, but it was cold and wet today. After the paint is mostly dry, you can peel the freezer paper away and... TA-DA! Amazing! Here are today's finished products:

Thanks to the runny silver paint and the 3-year old "helper", this one bled a bit. Okay, a lot...


Toby's shark worked well:


My stars bled a ton, too. I laid the paint on way too heavy.


Verna got the hang of the silver. Super groovy, Verna!


Here is a dragon shirt we made for Toby when he started school. The image wraps around the entire shirt. To paint it I ironed the stencil on the front and back and then held it from a hanger outside while I sprayed the paint.


This is an example of what can happen when I don't force myself to simplify. Here's to you, James Taylor:


Phew! Well, I think that may have made up for 5 weeks of no posts. Don't expect another one that long for a while, but I will try to keep up with my blog!

September 12, 2008

O' Fun For... fatties

I have been in a sewing frenzy this week. I am going to bet that I am having either a girl, or a very feminine boy. I hit the $1 and $2 fabric shelves at good ol' Wally's and completely lucked out. You never know, it's kind of hit and miss. You could score some cute swimsuit fabric, or maybe all there is that day are bolts and bolts of velvety, rust-colored upholstery fabric. Well, I came away dreaming of fatty clothes-a-plenty for my maternity-wearing days. (I've outgrown my jeans already. What is the deal with that?!) After scouring my boxes and boxes of Grama T. patterns, I was set to get rollin'.

Here we see the first shirt I made:


The pattern was a super-long v-neck tunic, and I only changed a few things. I added gathering under the bust and on the back, lettuce-edged the sleeves and neck out of laziness, added ric-rac (I may have spelled that wrong, but all the computer had for an alternate spelling suggestion was Richard. I am pretty sure I did not add Richard to the neckline. That could be awkward...) to the neck and some pleats to the middle. The next picture shows the gathered section in the back that I added to feel less tent-y:


Here in the next picture is a high-tech simulation of me being wayyy pregnant whilst wearing the shirt. (In real life I will look more like Monica from Friends in the fat suit.) I added 5 pleats on each side in the front to make it nice and roomy:


...and here is the same expert pregnancy simulation, but this time as if I were having twins: (I would like to credit Toby for the use of his soccer ball.)


The entire shirt, including thread, was about $2.50 when all was said and done. Woo-hoo!

I also made another preggo shirt. I tried to spray-stencil some flowers with spray paint, and it just had so many issues! I have been pretty successful with the freezer paper stencil so far, but only with fabric-specific spray paint. I had read that regular spray-paint worked too, so I thought I'd give it a try. It looked pretty crappy. Fortunately I had sprayed the fabric piece before I sewed it toether, so I just sewed it on inside-out, since the paint looked much better on the back of the fabric than the front. I also had to design my own sleeves for this pattern. They more-or-less worked. (Yay)


I have been cranking out the drawings of clothes I would like to make. This whole clothes-sketching thing was made much simpler by printing off this sample figure from Burdastyle. I just add some roundness to the middle, and there you go! I'll show more as I make them.

September 7, 2008

O' Fun For....a hurried and late entrance to stake conference (church)

I got ready for church today and realized that I had made a bunch of the things from my outfit, so I decided to add them to my fancy-schmancy new blog. Unfortunately, this meant taking pictures of me. Blah. All photos except bracelet courtesy of my easy-going husband, James.

So... here is my whole outfit:


The headband, shirt, skirt, and bracelet are made by me. The shoes were a super-kick-butt-awesome deal at $2, and matched my shirt and headband exactly, so of course I had to buy them! The earrings were provided by a persuasive Honduran while we were on our cruise this last spring. The headband is just the 3" of fabric I cut off the hem of my shirt when making it.

Here is the bracelet: (sorry about the scary hairy hand, but that's what the macro setting on the camera does for ya')


It is one of my first attempts of jewelry making, done with all the sparkly new beads I got from the gem fair. My friend Lauralee was nice enough to be bead-mom and tour-guide to a few of us newbies at the gem fair. "No, no, not those ones, follow me girls! Yes. Those are the right ones. Buy those." ; )


Here is a close-up of the shirt and the pattern I based it off:


The pattern is one of about a gazillion I rescued from my late Grama T.'s sewing room. Grama was a sewing queen, and being told by my Aunt Jill that I could take home what I wanted from her sewing room was like winning the crafty lottery. I used the basics of the pattern, but used elastic thread on the bobbin to gather the neck instead of casing with elastic. The sleeves were gathered using the handy "stretch the elastic really tight and sew the fabric onto it" method. (Patent pending...) I also lengthened it, added a few rows of shirring with elastic thread under the bust, and added some random buttons. Ta-da! You can tell it is one of my favorite shirts by how the jersey is pilling already! Blast! I'll have to make a bunch more for maternity shirts.

Here is a close-up of the skirt:


It is made from an old pair of white jeans that had gotten a bit too baggy in the bum and too short in the legs. Since I did not make a tutorial while sewing, here is my ever-so-lovely hand-drawn tutorial...


*STEP ONE: Cut off the legs right below the crotch, and the waisty-area right above the crotch, being careful not to cut off the bottom of the back pockets.

*STEP TWO: Cut the legs on each side seam and up the middle (front and back), and then cut them in half at the knee. Cut the hem off all pieces that have cuff hem. You should have 16 leg panely-things, like so:


They will not all be exactly the same shape, but oh-well.


*STEP THREE: Sew a bunch of the leg panels together lengthwise until it is long enough to comfortably wrap around your hip-area. (Sew with short ends of panels facing the same way, so the skirt kind of flares at the bottom.) I didn't use all 16 panels. Now sew the end shut, and you have the skirt-piece. Measure the opening at the bottom of the jean-waist piece, and add pleats to your skirt piece until the measurement at the top matches that measurement.

*STEP FOUR: Sew the skirt piece onto the bottom opening of the waist piece. You may want to pin it and try it on first to make sure the pleats don't sit funny anywhere.


*STEP FIVE: Zig-zag about half an inch from the bottom of the skirt, and then cut tiny slits in the hem about every 1/2 inch or so all the way around so that it will fray faster. Well, that's it! That is my first vaguely-helpful tutorial! I hope you enjoy!